
You’ve removed your old toilet and now you’re ready to install a newer, more modern model. Here are the steps to take to ensure that you hook everything up properly and prevent new water or gas leaks from flowing into your bathroom. As for tools, you will need a replacement flange or connector ring, your replacement toilet and seat, a new wax ring and supply line, a drill, and a rag.
Assessing the Wax Ring and Flange
Once you lifted your old toilet off the floor and moved it out of the way, you exposed the wax ring. Be sure to assess the condition of the wax ring and flange as it may need replacing. You can choose to put on a whole new flange or to add a flange connector ring, depending on the severity of the damage. Fortunately, both options are quite straightforward in terms of drilling in the replacement or connector ring so that it’s tight and secure. Be sure that you have a rag bunched up in the wax ring hole so that your tools don’t fall in!
At this point, you can place the new toilet bowl bolts upright in the flange. Your new toilet will come with brand-new nuts and bolts so use those. Also, be sure to take the rag out of the wax ring hole before installing your new toilet bowl. Make sure that the new toilet bolts are secure and ready for the new toilet bowl.
Now you can put on a new wax ring since you scraped the old one off when you removed your old toilet. Some people choose to attach the new wax ring to the bottom of the new toilet bowl while others place the wax ring on the flange itself.
If you attach the new wax ring to the bottom of the bowl, then be very careful when you lay the new toilet on its side. Make sure that you place a cushioned surface on the floor first, such as a piece of carpeting or an area rug. This will allow you to place the toilet on its side without damaging the floor or your brand-new toilet. Moreover, placing the wax ring directly on the toilet ensures that you properly line up the wax ring with the flange during installation.
If you choose the second option of placing the wax ring on the flange itself, you will need to gently position the wax ring on the flange, making sure that it is as secure as possible. An expert tip here is that you want to choose a wax ring that is about the same thickness as your bathroom floor. What this means is that if you have had renovated tiling placed over your pre-existing flooring, then it would be in your best interest to get a thicker wax ring.
Align the Toilet Bowl with the Flange
At this point, it’s time to lift the new toilet bowl and place it on the flange. Regardless of whether you placed the wax ring to the bowl itself or on the flange, you need to make sure that everything is aligned. Be extremely careful as you hold the toilet bowl and line it up over the flange so that the bolt holes in the base of the bowl match up with the bolts in the flange. It might help to have someone who can help you lift the bowl and properly align it so that you avoid chips in the toilet.
When everything is lined up and the toilet is on the ground, use some pressure with your hands to set the seal of the wax ring. You need to be super careful not to move the toilet or nudge it once you seal it since this could cause the wax seal to break, making your toilet prone to leaks.
Secure and Bolt the Toilet
The next step is to secure the toilet base to the floor via the nuts and bolts that came with the new unit. The bolts should be sticking upright since you lined them up from the flange. Place a washer on each bolt, followed by a nut. Start by hand-tightening the nuts, alternating from one side to the other so that you keep the pressure even on both sides of the toilet. This also keeps the wax ring’s seal strong. After hand-tightening, alternate tightening the nuts with your wrench. You don’t want to over-tighten, though, as this could cause cracks in your toilet bowl.
The bolts on your new toilet may extend higher up on the base, creating an unattractive look and potential danger. If this is the case, you can use a hacksaw to cut off a bit of the bolt before putting on the bolt caps.
Attaching the Toilet Tank
It’s now time to place the tank on your new toilet bowl if it’s not already attached to the unit. Flip the tank on its side and place the bowl-to-tank gasket on the bottom of the flush valve. Then screw in the bolts through the inside of the tank so they come out on the bottom. Add on the washers, lift the tank, and place it on top of the bowl. The bolts will align with the bolt holes on the bowl. Put on the nuts and alternately tighten them on each side, making sure that the tank is in line with the bowl.
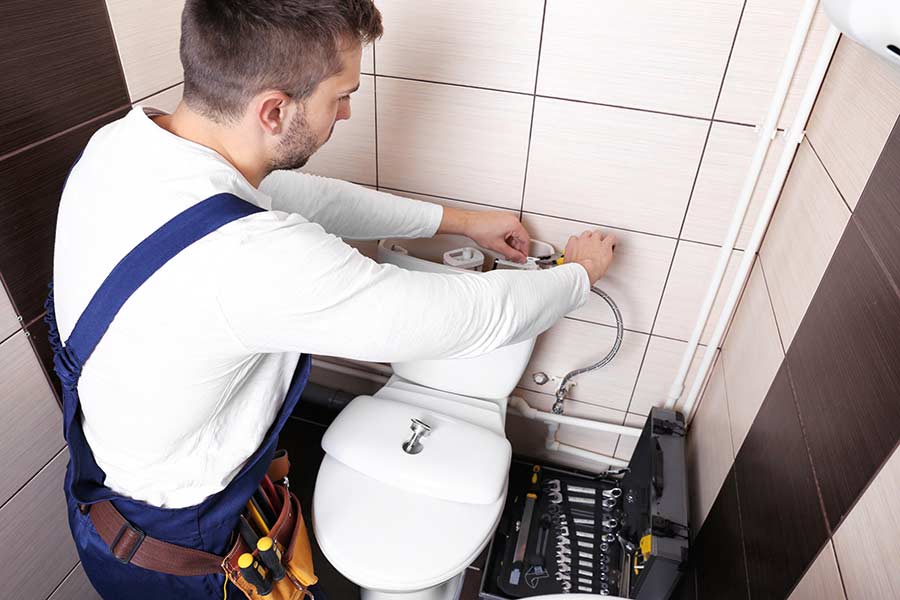
Now you can reattach the supply line (or attach the new one you bought) to the fill valve on the tank. The fill valve should be easily visible and poking out from the bottom of the tank. When you tighten the supply line to the tank’s fill valve, attach it to the water supply line that is on the floor or wall behind the toilet.
Test for Leaks and Put on the New Seat
With the supply line secured, turn on the water valve so you can test for leaks. Turn it on slowly and allow the tank to fill with water. Then flush the new toilet and keep an eye on the toilet’s base and where the bottom of the tank sits on the bowl, checking for water leakage. Run your fingers along these places to see if there is any wetness or moisture.
Grab your new toilet seat and place it on top of the bowl. Screw it on and then place the lid on the tank to complete your installation.