
It can seem a bit intimidating to go about replacing your home’s toilet but if you take it step by step, you should be just fine. Moreover, it doesn’t matter if you have a traditional round toilet bowl or an elongated one since the process is similar for both of these models.
As for the tools you will need, be sure to gather all of your supplies before you start trying to remove your toilet. This will make everything go much more smoothly! The tools you will need include an adjustable wrench, bucket, plunger, rag, sponge, and utility knife.
It’s important to note that the water supply line for your current toilet is probably just about as old as the toilet that you’re replacing. Therefore, it makes sense to remove this as well since it will help the new toilet function at its best. Don’t worry, though, because removing the water supply line won’t add much more work to the task of removing the toilet.
Shutting Off the Water Valve and Removing Water
Now that the basic information is out of the way, it’s time to start removing that old toilet. Start by turning off the water supply to your toilet. You can do this by turning the water shut-off valve that is located either on the floor or the wall behind your toilet. Once you turn this off, you should flush the toilet so you can remove all of the water stored in the tank. The water in the tank is what’s used whenever you flush the toilet but since you turned the water valve off, this tank water will simply drain.
As a result, your toilet bowl won’t fill up with tank water. You might still have a bit of water in the bowl so if you grab a plunger you can use it to push the rest of the water down the drain. Obviously, you don’t want any water to be in the toilet when you remove it! There might be a bit of water left in the tank; if that’s the case, you can use a large sponge to soak up the remaining water and transfer it to a bucket. Don’t be worried if there is a tiny amount of water left over. As long as you keep the toilet upright throughout the removal process, the water will stay in the toilet and won’t leak all over you or your bathroom.
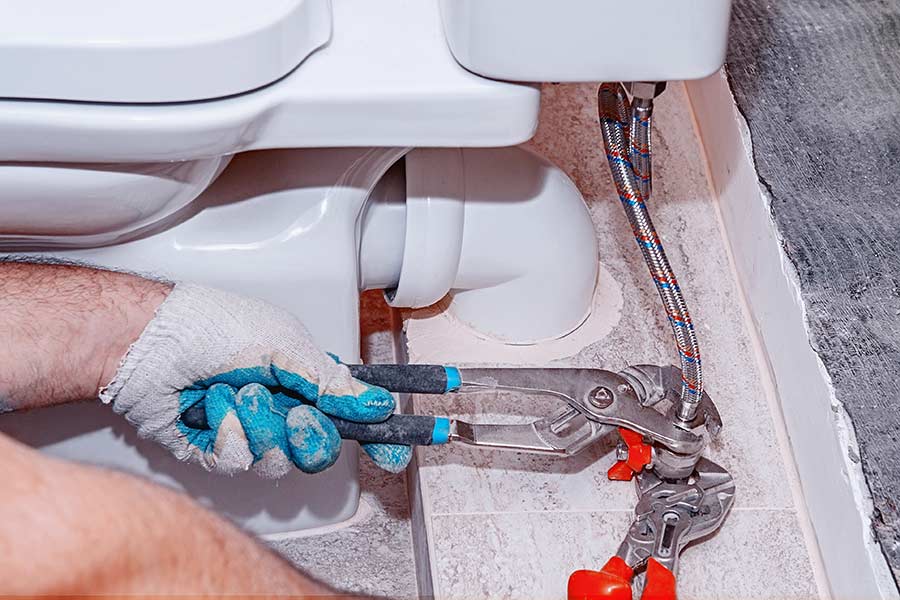
Disconnecting the Water Supply Line
The next step is to disconnect the supply line, which is located behind the toilet. Grab your adjustable wrench and loosen the hose line that is attached to the water shutoff valve. It’s likely that this will be quite tight, especially if your toilet is many years old. It can help to spray some anti-corrosion spray on the screws to break down any built-up rust. Just make sure that you use a rag so that the spray isn’t going everywhere and covering your hands.
Another crucial point here is that you want to pay attention to unscrewing the water supply line that is attached to the wall or floor. Make sure that you’re only loosening the toilet’s supply line, not the entire connection on the wall or floor. Don’t be alarmed if some water comes out of the supply line when you loosen it. This is totally normal and you should be able to wipe it all up with a rag or towel.
Unbolting the Toilet
Now that the water supply line is disconnected from the toilet, you can now start unbolting the unit from the floor. A good tip is to separate the tank from the toilet bowl, especially if you are working by yourself. This will make the entire process easier because you won’t be working with a big, heavy unit but rather two manageable pieces. If it’s possible to separate the tank from the bowl, do that. You might have a model that doesn’t allow for tank and bowl separation, in which case it may help to call in an assistant.
If you are going to disconnect the tank from the bowl, start by unscrewing the bolts underneath the tank with a wrench. Use a screwdriver to unscrew the bolts from the top; these will be located in the tank itself. Once the bolts are out, you can lift the tank up off of the toilet bowl and place it to the side.
At this point, you can work on taking the floor bolts off the bowl. Start at the toilet bowl caps, which are located around the base. You might need to use a flathead screwdriver to pry them open. Then use your wrench to loosen the nuts, removing them along with the washers. In the case of very corroded or stuck-on bolts, you can use a hacksaw to cut through them so you can lift the toilet bowl off the floor. Don’t worry because your new replacement toilet will come with its own clean nuts and bolts.
If there is waterproof caulking around the base of the toilet, use a utility knife to cut through the caulk so that the toilet can break free. You can then place both hands on the toilet bowl to move it back and forth, easing it free of the caulking.
When you lift the toilet bowl, you will expose the wax ring that was underneath the toilet. A wax ring is a type of gasket that is made using beeswax or a synthetic material along with rubber. Check the toilet bolts on the flange of the wax ring to see if you need to replace them or if they’re still in good shape and can be reused. Use a paint scraper to take off the old wax ring and remove any residual wax. In addition, ball up the rag and stuff it into the ring hole to prevent any of your tools from falling down there. It will also keep any stinky odors from the sewage system from wafting into the room. You’ve successfully removed your toilet and you’re now ready to install your new unit.
Related Resources