
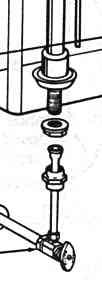
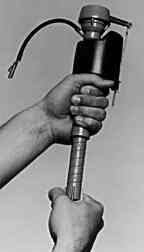
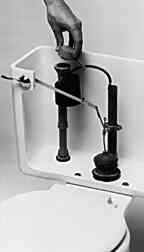
The hardest part of replacing a refill valve is removing the old one. The valve is held in the toilet tank by a large nut on the underside of the tank. The large nut closest to the tank is holding the valve upright in the tank, the second nut just below connects the valve to the water supply pipe.
You first must SHUT OFF THE WATER, flush the toilet and then sponge up the remaining one inch of water in the bottom of the tank. Put several old towels on the floor under the tank to catch any water that drips out while you are working.
The best tool to use for loosening the large nuts is a ten-inch or 12-inch adjustable wrench. This tool has flat jaws that will fit snug around the nuts, and its long handle gives you very good leverage. It helps greatly to spray the nuts with penetrating lubricant the night before you begin this job.
Once the nuts are loose, let them slip down over the supply pipe and lift the old valve out of the tank and discard it. If you want to reuse the supply line, don’t move or bend it. It’s in just the right position for the new valve. Once the supply pipe is moved, it’s quite difficult to make watertight connections. However, it’s so easy to replace a supply line today with flexible connectors that it’s hardly worth the time and trouble of trying to use the old one.
If you can’t get the nuts loose, you will have to use a hack saw and saw through the nut and the shank of the refill valve right next to the china. This is awkward but possible; it takes 30 to 45 minutes to do. DON’T TRY TO BREAK THE NUT WITH A HAMMER, you’ll only crack the tank. There is no other way; professional plumbers don’t have special tools or magic bullets, they will also saw through the nuts.
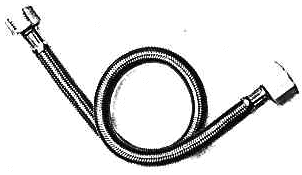
Flexible supply lines come in several lengths with both ends attached. There’s nothing to cut which was always the big problem in the past. Pay attention when you are shopping for a flexible supply line, because they are available for faucets as well as toilets; faucets and toilets have different size threaded connections.
Step by Step
For purposes of illustrating how to install a new refill valve, the following instructions are specifically for a Fluidmaster 400A refill valve. This valve is reasonably priced, widely available, fits all but a few toilets, meets plumbing codes, comes with good installation instructions and is used worldwide by over 50 manufacturers of toilets as original equipment. These instructions can be applied to other types of valves, but its best to just review any instructions that are included with the valves.
Once properly installed the Fluidmaster 400A is a very reliable refill valve, but that does not mean it will last forever. All of the suggestions for testing your toilet regularly for leaks still apply. In keeping with using the Fluidmaster as my installation example, I am also providing the TROUBLESHOOTING CHART for the 400A valve.
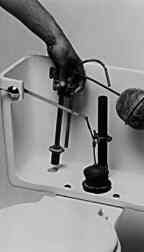
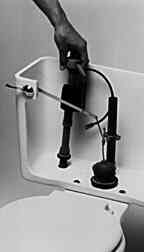
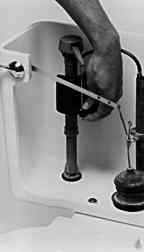
Begin by turning off the water supply to the toilet either under the toilet or at the main house water shutoff. Next, protect or remove carpeting or rugs that can be damaged by water. No matter how careful you are, it’s almost impossible to avoid getting the floor wet. Next flush the toilet to drain the tank. You’ll have to sponge up the remaining water in the bottom of the tank. Disconnect the supply line under the tank and unscrew the nut holding the refill upright in the tank and remove the valve (see previous page).
You must prepare the refill valve first before you install it. (1) It has to be adjusted to fit various size tanks. Measure the height of the overflow pipe and unscrew the base of the valve until the CRITICAL LEVEL RING ( marked C.L.) on the top of the valve is 1-inch above the overflow pipe. (2) Then the shank washer has to be separated from the cone washer and pushed onto the threaded end of the valve with the flat side against the valve.
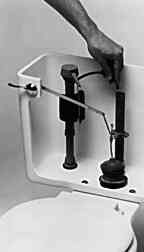
Position the new refill valve in the tank so that the float cup doesn’t make contact with walls of the tank. Push down firmly on the shank of the valve (not the top) with one hand as you hand tighten the nut under the tank with your other hand. Then with a wrench tighten 1/2 turn beyond hand tight. CAUTION: tighten too much and you crack the tank; not tight enough and it leaks.
Reattach the supply line. As you can see from the illustration there are several sizes and styles of supply lines. I suggest you buy a new flexible supply line. They come with nuts and washers already attached to both ends and are much easier to install than trying to get a watertight fitting with a supply line that has already been used.
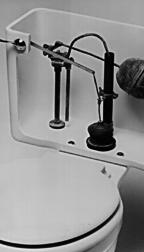
Attach the angle adapter to one end of the refill tube and attach the other end of the refill tube to the nipple on the top of the valve located just below the cap. Clip the angle adapter to the top edge of the overflow pipe. Cut the refill tube to size if necessary. Never insert the tube inside the overflow pipe. With the tube down inside the overflow pipe, it’s possible to start a non-stop siphoning of water out of the tank.
Reattach the flush valve chain or strap to the trip handle. The chain should be long enough to just have a little bit of slack. Too short and the flush valve won’t close; too long and the trip lever will hit the lid of the tank and the flush valve won’t stay open long enough to flush the toilet.
If you have a problem with a chain getting caught under the flapper when it closes, try slipping a short length of a plastic straw over the chain. The straw will stiffen the chain and keep it from getting stuck under the flapper.
Finally, you have to open the top of the refill valve and flush it out. Unscrew the cap by lifting arm and rotating top 1/8 a turn counterclockwise. Hold a cup over the top while you turn the water supply on and off a few times to clear the line of sand and silt. Turn the water off and replace the cap. Make sure it is fully turned into the locked position before turning the water back on.
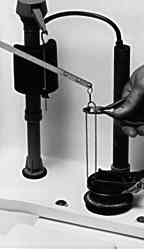
The last step is to adjust the water level which is controlled by the setting for the float cup. The water level should be at least 1/2-inch below the top of the overflow pipe. You’ll see a small stainless steel clip on a slender vertical rod attached to the side of the valve. Squeezing the clip and sliding it up the rod will raise the water level; sliding it down will lower it. IMPORTANT: the water level must be kept at least a 1/2-inch below the top of the overflow.
Note: I have attempted to make the instructions for installing a new refill valve as generic as possible. But there are different adjustments that must be made for each type of valve, and you need to read all of the instructions that come with whatever refill valve you purchase.