
There are dozens of different refill valves (a.k.a. ballcocks & fill valves). They’re made of a variety of materials and come in many different shapes and sizes, but they are all designed to turn the water on and off to the tank and to regulate the level of the water inside the tank. In every case, it’s a matter of figuring out how to open up the top of the refill valve in order to replace the washer, seals, diaphragm, piston or whatever the manufacturer has chosen to call the parts inside their valve. Some of the valves are quite simple in design with just one or two replaceable parts. Others are extremely complex with many parts.
It was recently called to my attention by a professional plumber that I am showing refill valves in Toiletology 101 that do not meet today’s plumbing codes because they do not have anti-siphon protection built into their design.
His recommendation is that these old refill valves should not be fixed, but instead, they should be replaced with modern anti-siphon protected devices. He is correct. Please read the explanation for “anti-siphon” before starting to repair an existing refill valve. Quite honestly, it is often easier to replace a refill valve than it is to take one apart, find the parts, then reassemble the valve. I leave it to you to decide whether to fix or replace. But don’t delay; replacing an old valve is not so difficult. But if the idea of replacing an old valve, intimidates you, call your plumber. It doesn’t take long for a leaking toilet to cost you more in water and sewer bills than the plumber will charge to replace the valve.
That said, here’s how to fix an existing refill valve…
HINT: One of the difficulties of loosening parts that are in close contact with water is that they are frequently cemented in place by water minerals.
Generously spraying the parts with a penetrating lubricant helps to free them up. Penetrating lubricants need time to work their magic, so spray the parts the night before you expect to work on the valve.
Anytime you are loosening screws make certain your screwdriver fits the slot or star of the screw snugly. Most screws used in toilet tanks are brass and easily damaged when a screwdriver that is too small or too large is used. Once the head of a screw is damaged, it is almost impossible to remove it without resorting to some special tools. A damaged screw can sometimes be removed by drilling a small hole in the top and then using a “screw extractor” tool to back the screw out. Don’t use any tool that requires a “banging” force.
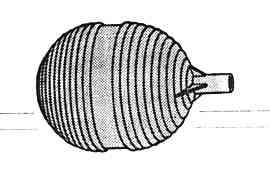
If your dye and pencil tests indicate the refill valve as the problem causing a running toilet, the first thing to do is unscrew the large float ball and shake it. If there’s any water in it, it should be replaced. It must be able to float on top of the water in order to turn the water off.
While it’s usually a short-term repair, bending the float arm down slightly may increase the pressure on the valve and turn the water off. You want the water level in the tank to stop about half-inch from the top of the overflow pipe.
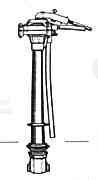
The Classic Ballcock

The classic ballcock that has been around for decades is one that is all metal with a number of interconnecting links. On one side of the top you’ll find two thumbscrews. The top of the valve, the rod and the float ball can be lifted out of the tank when those two thumb screws are loosened and removed. Part of the top that comes out will be a cylindrical plunger (piston) with a small rubber washer attached to the bottom. This washer is the part that needs replacing. There are several different types and sizes of plungers. To assure getting the proper replacement part, take the entire plunger with you to the hardware store.
There are usually two washers on a plunger –the one on the bottom turns the water off and on, and the second one is around the body of the plunger. This one prevents water from spraying out of the top of the valve.
In addition to the washers found on the plunger, there will usually be a “seat” down inside the body of the refill valve. If you can see an opening with either a square or hex hole, it is a removable seat. Use a “seat remover” tool to unscrew the seat. These tools come in several styles. One has tapered ends and another has two or three stepped sizes on each end. Use the type with the stepped ends. You can also use a large “screw extractor” tool. If the hole is round, it is not removable, and when damaged the refill valve will have to be replaced.
Another quite common type of valve has a round top that is about two to two and a half inches in diameter and somewhat flat. It comes in metal, plastic and a combination of both. When the three screws on the top are removed, the top lifts off and makes the internal parts accessible. Take all the parts and the name that is embossed on the top to the hardware store. Several manufacturers make this type of valve and although they look similar, the parts are not interchangeable.
When you encounter a refill valve that you can’t open for some reason or the parts are not available, rather than spend great amounts of time trying to rescue the old valve, it’s time to replace it with a new one.